快速入门 | Quick Start
Welcome to the React documentation! This page will give you an introduction to the 80% of React concepts that you will use on a daily basis.
欢迎来到 React 文档!本章节将介绍你每天都会使用的 80% 的 React 概念。
你将会学习到
- How to create and nest components
- 如何创建和嵌套组件
- How to add markup and styles
- 如何添加标签和样式
- How to display data
- 如何显示数据
- How to render conditions and lists
- 如何渲染条件和列表
- How to respond to events and update the screen
- 如何对事件做出响应并更新界面
- How to share data between components
- 如何在组件间共享数据
创建和嵌套组件 | Creating and nesting components
React apps are made out of components. A component is a piece of the UI (user interface) that has its own logic and appearance. A component can be as small as a button, or as large as an entire page.
React 应用程序是由 组件 组成的。一个组件是 UI(用户界面)的一部分,它拥有自己的逻辑和外观。组件可以小到一个按钮,也可以大到整个页面。
React components are JavaScript functions that return markup:
React 组件是返回标签的 JavaScript 函数:
function MyButton() {
  return (
    <button>I'm a button</button>
  );
}
Now that you’ve declared MyButton, you can nest it into another component:
至此,你已经声明了 MyButton,现在把它嵌套到另一个组件中:
export default function MyApp() {
  return (
    <div>
      <h1>Welcome to my app</h1>
      <MyButton />
    </div>
  );
}
Notice that <MyButton /> starts with a capital letter. That’s how you know it’s a React component. React component names must always start with a capital letter, while HTML tags must be lowercase.
你可能已经注意到 <MyButton /> 是以大写字母开头的。你可以据此识别 React 组件。React 组件必须以大写字母开头,而 HTML 标签则必须是小写字母。
Have a look at the result:
来看下效果:
function MyButton() {
  return (
    <button>
      I'm a button
    </button>
  );
}

export default function MyApp() {
  return (
    <div>
      <h1>Welcome to my app</h1>
      <MyButton />
    </div>
  );
}
The export default keywords specify the main component in the file. If you’re not familiar with some piece of JavaScript syntax, MDN and javascript.info have great references.
export default 关键字指定了文件中的主要组件。如果你对 JavaScript 某些语法不熟悉,可以参考 MDN 和 javascript.info。
使用 JSX 编写标签 | Writing markup with JSX
The markup syntax you’ve seen above is called JSX. It is optional, but most React projects use JSX for its convenience. All of the tools we recommend for local development support JSX out of the box.
上面所使用的标签语法被称为 JSX。它是可选的,但大多数 React 项目会使用 JSX,主要是它很方便。所有 我们推荐的本地开发工具 都开箱即用地支持 JSX。
JSX is stricter than HTML. You have to close tags like <br />. Your component also can’t return multiple JSX tags. You have to wrap them into a shared parent, like a <div>...</div> or an empty <>...</> wrapper:
JSX 比 HTML 更加严格。你必须闭合标签,如 <br />。你的组件也不能返回多个 JSX 标签。你必须将它们包裹到一个共享的父级中,比如 <div>...</div> 或使用空的 <>...</> 包裹:
function AboutPage() {
  return (
    <>
      <h1>About</h1>
      <p>Hello there.<br />How do you do?</p>
    </>
  );
}
If you have a lot of HTML to port to JSX, you can use an online converter.
如果你有大量的 HTML 需要移植到 JSX 中,你可以使用 在线转换器。
添加样式 | Adding styles
In React, you specify a CSS class with className. It works the same way as the HTML class attribute:
在 React 中,你可以使用 className 来指定一个 CSS 的 class。它与 HTML 的 class 属性的工作方式相同:
<img className="avatar" />Then you write the CSS rules for it in a separate CSS file:
然后,你可以在一个单独的 CSS 文件中为它编写 CSS 规则:
/* In your CSS */
.avatar {
  border-radius: 50%;
}
React does not prescribe how you add CSS files. In the simplest case, you’ll add a <link> tag to your HTML. If you use a build tool or a framework, consult its documentation to learn how to add a CSS file to your project.
React 并没有规定你如何添加 CSS 文件。最简单的方式是使用 HTML 的 <link> 标签。如果你使用了构建工具或框架,请阅读其文档来了解如何将 CSS 文件添加到你的项目中。
显示数据 | Displaying data
JSX lets you put markup into JavaScript. Curly braces let you “escape back” into JavaScript so that you can embed some variable from your code and display it to the user. For example, this will display user.name:
JSX 会让你把标签放到 JavaScript 中。而大括号会让你 “回到” JavaScript 中,这样你就可以从你的代码中嵌入一些变量并展示给用户。例如,这将显示 user.name:
return (
  <h1>
    {user.name}
  </h1>
);
You can also “escape into JavaScript” from JSX attributes, but you have to use curly braces instead of quotes. For example, className="avatar" passes the "avatar" string as the CSS class, but src={user.imageUrl} reads the JavaScript user.imageUrl variable value, and then passes that value as the src attribute:
你还可以将 JSX 属性 “转义到 JavaScript”,但你必须使用大括号 而非 引号。例如,className="avatar" 是将 "avatar" 字符串传递给 className,作为 CSS 的 class。但 src={user.imageUrl} 会读取 JavaScript 的 user.imageUrl 变量,然后将该值作为 src 属性传递:
return (
  <img
    className="avatar"
    src={user.imageUrl}
  />
);
You can put more complex expressions inside the JSX curly braces too, for example, string concatenation:
你也可以把更为复杂的表达式放入 JSX 的大括号内,例如 字符串拼接:
const user = {
  name: 'Hedy Lamarr',
  imageUrl: 'https://i.imgur.com/yXOvdOSs.jpg',
  imageSize: 90,
};

export default function Profile() {
  return (
    <>
      <h1>{user.name}</h1>
      <img
        className="avatar"
        src={user.imageUrl}
        alt={'Photo of ' + user.name}
        style={{
          width: user.imageSize,
          height: user.imageSize
        }}
      />
    </>
  );
}
In the above example, style={{}} is not a special syntax, but a regular {} object inside the style={ } JSX curly braces. You can use the style attribute when your styles depend on JavaScript variables.
在上面示例中,style={{}} 并不是一个特殊的语法,而是 style={ } JSX 大括号内的一个普通 {} 对象。当你的样式依赖于 JavaScript 变量时,你可以使用 style 属性。
条件渲染 | Creating and nesting components
In React, there is no special syntax for writing conditions. Instead, you’ll use the same techniques as you use when writing regular JavaScript code. For example, you can use an if statement to conditionally include JSX:
React 没有特殊的语法来编写条件语句,因此你使用的就是普通的 JavaScript 代码。例如使用 if 语句根据条件引入 JSX:
let content;
if (isLoggedIn) {
  content = <AdminPanel />;
} else {
  content = <LoginForm />;
}
return (
  <div>
    {content}
  </div>
);
If you prefer more compact code, you can use the conditional ? operator. Unlike if, it works inside JSX:
如果你喜欢更为紧凑的代码,可以使用 条件 ? 运算符。与 if 不同的是,它工作于 JSX 内部:
<div>
  {isLoggedIn ? (
    <AdminPanel />
  ) : (
    <LoginForm />
  )}
</div>
When you don’t need the else branch, you can also use a shorter logical && syntax:
当你不需要 else 分支时,你也可以使用更简短的 逻辑 && 语法:
<div>
  {isLoggedIn && <AdminPanel />}
</div>
All of these approaches also work for conditionally specifying attributes. If you’re unfamiliar with some of this JavaScript syntax, you can start by always using if...else.
所有这些方法也适用于有条件地指定属性。如果你对 JavaScript 语法不熟悉,你可以先使用 if...else。
渲染列表 | Rendering lists
You will rely on JavaScript features like for loop and the array map() function to render lists of components.
你将依赖 JavaScript 的特性,例如 for 循环 和 array 的 map() 函数 来渲染组件列表。
For example, let’s say you have an array of products:
假设你有一个产品数组:
const products = [
  { title: 'Cabbage', id: 1 },
  { title: 'Garlic', id: 2 },
  { title: 'Apple', id: 3 },
];
Inside your component, use the map() function to transform an array of products into an array of <li> items:
在你的组件中,使用 map() 函数将这个数组转换为 <li> 标签构成的列表:
const listItems = products.map(product =>
  <li key={product.id}>
    {product.title}
  </li>
);

return (
  <ul>{listItems}</ul>
);
Notice how <li> has a key attribute. For each item in a list, you should pass a string or a number that uniquely identifies that item among its siblings. Usually, a key should be coming from your data, such as a database ID. React uses your keys to know what happened if you later insert, delete, or reorder the items.
注意, <li> 有一个 key 属性。对于列表中的每一个元素,你都应该传递一个字符串或者数字给 key,用于在其兄弟节点中唯一标识该元素。通常 key 来自你的数据,比如数据库中的 ID。如果你在后续插入、删除或重新排序这些项目,React 将依靠你提供的 key 来思考发生了什么。
const products = [
  { title: 'Cabbage', isFruit: false, id: 1 },
  { title: 'Garlic', isFruit: false, id: 2 },
  { title: 'Apple', isFruit: true, id: 3 },
];

export default function ShoppingList() {
  const listItems = products.map(product =>
    <li
      key={product.id}
      style={{
        color: product.isFruit ? 'magenta' : 'darkgreen'
      }}
    >
      {product.title}
    </li>
  );

  return (
    <ul>{listItems}</ul>
  );
}
响应事件 | Responding to events
You can respond to events by declaring event handler functions inside your components:
你可以通过在组件中声明 事件处理 函数来响应事件:
function MyButton() {
  function handleClick() {
    alert('You clicked me!');
  }

  return (
    <button onClick={handleClick}>
      Click me
    </button>
  );
}
Notice how onClick={handleClick} has no parentheses at the end! Do not call the event handler function: you only need to pass it down. React will call your event handler when the user clicks the button.
注意,onClick={handleClick} 的结尾没有小括号!不要 调用 事件处理函数:你只需 把函数传递给事件 即可。当用户点击按钮时 React 会调用你传递的事件处理函数。
更新界面 | Updating the screen
Often, you’ll want your component to “remember” some information and display it. For example, maybe you want to count the number of times a button is clicked. To do this, add state to your component.
通常你会希望你的组件 “记住” 一些信息并展示出来,比如一个按钮被点击的次数。要做到这一点,你需要在你的组件中添加 state。
First, import useState from React:
首先,从 React 引入 useState:
import { useState } from 'react';Now you can declare a state variable inside your component:
现在你可以在你的组件中声明一个 state 变量:
function MyButton() {
  const [count, setCount] = useState(0);
  // ...
You’ll get two things from useState: the current state (count), and the function that lets you update it (setCount). You can give them any names, but the convention is to write [something, setSomething].
你将从 useState 中获得两样东西:当前的 state(count),以及用于更新它的函数(setCount)。你可以给它们起任何名字,但按照惯例会像 [something, setSomething] 这样为它们命名。
The first time the button is displayed, count will be 0 because you passed 0 to useState(). When you want to change state, call setCount() and pass the new value to it. Clicking this button will increment the counter:
第一次显示按钮时,count 的值为 0,因为你把 0 传给了 useState()。当你想改变 state 时,调用 setCount() 并将新的值传递给它。点击该按钮计数器将递增:
function MyButton() {
  const [count, setCount] = useState(0);

  function handleClick() {
    setCount(count + 1);
  }

  return (
    <button onClick={handleClick}>
      Clicked {count} times
    </button>
  );
}
React will call your component function again. This time, count will be 1. Then it will be 2. And so on.
React 将再次调用你的组件函数。第一次 count 变成 1。接着点击会变成 2。继续点击会逐步递增。
If you render the same component multiple times, each will get its own state. Click each button separately:
如果你多次渲染同一个组件,每个组件都会拥有自己的 state。你可以尝试点击不同的按钮:
import { useState } from 'react';

export default function MyApp() {
  return (
    <div>
      <h1>Counters that update separately</h1>
      <MyButton />
      <MyButton />
    </div>
  );
}

function MyButton() {
  const [count, setCount] = useState(0);

  function handleClick() {
    setCount(count + 1);
  }

  return (
    <button onClick={handleClick}>
      Clicked {count} times
    </button>
  );
}
Notice how each button “remembers” its own count state and doesn’t affect other buttons.
注意,每个按钮会 “记住” 自己的 count,而不影响其他按钮。
使用 Hook | Using Hooks
Functions starting with use are called Hooks. useState is a built-in Hook provided by React. You can find other built-in Hooks in the API reference. You can also write your own Hooks by combining the existing ones.
以 use 开头的函数被称为 Hook。useState 是 React 提供的一个内置 Hook。你可以在 React API 参考 中找到其他内置的 Hook。你也可以通过组合现有的 Hook 来编写属于你自己的 Hook。
Hooks are more restrictive than other functions. You can only call Hooks at the top of your components (or other Hooks). If you want to use useState in a condition or a loop, extract a new component and put it there.
Hook 比普通函数更为严格。你只能在你的组件(或其他 Hook)的 顶层 调用 Hook。如果你想在一个条件或循环中使用 useState,请提取一个新的组件并在组件内部使用它。
组件间共享数据 | Sharing data between components
In the previous example, each MyButton had its own independent count, and when each button was clicked, only the count for the button clicked changed:
在前面的示例中,每个 MyButton 都有自己独立的 count,当每个按钮被点击时,只有被点击按钮的 count 才会发生改变:

Initially, each MyButton’s count state is 0
起初,每个 MyButton 的 count state 均为 0


The first MyButton updates its count to 1
第一个 MyButton 会将 count 更新为 1
However, often you’ll need components to share data and always update together.
然而,你经常需要组件 共享数据并一起更新。
To make both MyButton components display the same count and update together, you need to move the state from the individual buttons “upwards” to the closest component containing all of them.
为了使得 MyButton 组件显示相同的 count 并一起更新,你需要将各个按钮的 state “向上” 移动到最接近包含所有按钮的组件之中。
In this example, it is MyApp:
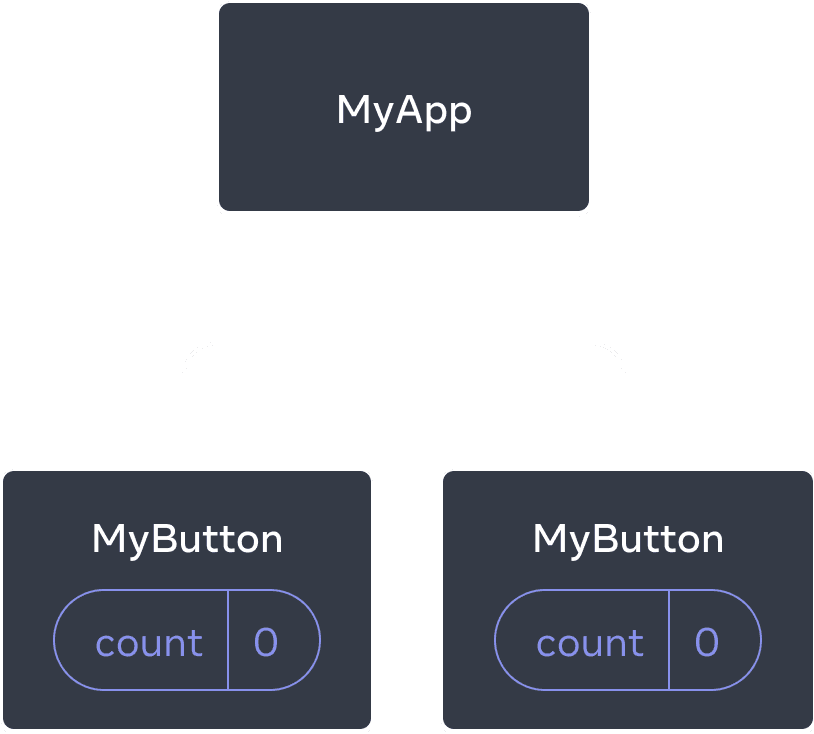
在这个示例中,它是 MyApp:


Initially, MyApp’s count state is 0 and is passed down to both children
起初,MyApp 的 count state 为 0 并传递给了两个子组件


On click, MyApp updates its count state to 1 and passes it down to both children
点击后,MyApp 将 count state 更新为 1,并将其传递给两个子组件
Now when you click either button, the count in MyApp will change, which will change both of the counts in MyButton. Here’s how you can express this in code.
此刻,当你点击任何一个按钮时,MyApp 中的 count 都将改变,同时会改变 MyButton 中的两个 count。具体代码如下:
First, move the state up from MyButton into MyApp:
首先,将 MyButton 的 state 上移到 MyApp 中:
export default function MyApp() {
  const [count, setCount] = useState(0);

  function handleClick() {
    setCount(count + 1);
  }

  return (
    <div>
      <h1>Counters that update separately</h1>
      <MyButton />
      <MyButton />
    </div>
  );
}

function MyButton() {
  // ... we're moving code from here ...
}
Then, pass the state down from MyApp to each MyButton, together with the shared click handler. You can pass information to MyButton using the JSX curly braces, just like you previously did with built-in tags like <img>:
接着,将 MyApp 中的点击事件处理函数以及 state 一同向下传递到 每个 MyButton 中。你可以使用 JSX 的大括号向 MyButton 传递信息。就像之前向 <img> 等内置标签所做的那样:
export default function MyApp() {
  const [count, setCount] = useState(0);

  function handleClick() {
    setCount(count + 1);
  }

  return (
    <div>
      <h1>Counters that update together</h1>
      <MyButton count={count} onClick={handleClick} />
      <MyButton count={count} onClick={handleClick} />
    </div>
  );
}
The information you pass down like this is called props. Now the MyApp component contains the count state and the handleClick event handler, and passes both of them down as props to each of the buttons.
使用这种方式传递的信息被称作 prop。此时 MyApp 组件包含了 count state 以及 handleClick 事件处理函数,并将它们作为 prop 传递给 了每个按钮。
Finally, change MyButton to read the props you have passed from its parent component:
最后,改变 MyButton 以 读取 从父组件传递来的 prop:
function MyButton({ count, onClick }) {
  return (
    <button onClick={onClick}>
      Clicked {count} times
    </button>
  );
}
When you click the button, the onClick handler fires. Each button’s onClick prop was set to the handleClick function inside MyApp, so the code inside of it runs. That code calls setCount(count + 1), incrementing the count state variable. The new count value is passed as a prop to each button, so they all show the new value. This is called “lifting state up”. By moving state up, you’ve shared it between components.
当你点击按钮时,onClick 处理程序会启动。每个按钮的 onClick prop 会被设置为 MyApp 内的 handleClick 函数,所以函数内的代码会被执行。该代码会调用 setCount(count + 1),使得 state 变量 count 递增。新的 count 值会被作为 prop 传递给每个按钮,因此它们每次展示的都是最新的值。这被称为“状态提升”。通过向上移动 state,我们实现了在组件间共享它。
import { useState } from 'react';

export default function MyApp() {
  const [count, setCount] = useState(0);

  function handleClick() {
    setCount(count + 1);
  }

  return (
    <div>
      <h1>Counters that update together</h1>
      <MyButton count={count} onClick={handleClick} />
      <MyButton count={count} onClick={handleClick} />
    </div>
  );
}

function MyButton({ count, onClick }) {
  return (
    <button onClick={onClick}>
      Clicked {count} times
    </button>
  );
}